
ARB Switch Panel with Accessory Switches
|
Tech information furnished by Rick Alexander ARB Switch Panel with Accessory Switches Have an annoying hole in your FJ40s dash since the radio was removed? Ever have a radio in your 40? I did at one time, but for the most part I like hearing the motor running, the Geolander M/Ts whining, and other sounds associated with piloting a vehicle being maintained by a neophyte cruiser mechanic...meaning me. I recently had a shop install the ARB air lockers that had been on my work bench for a year, but to save money AND have the wiring done my way, I opted to take over after the lockers, compressor, and air tank were plumbed. Since I had the switches from the ARB lockers, I needed the switch for the ARB compressor as mine was a Viair unit and not ARB. Easy enough, as these can be ordered from many vendors. Browsing for switches, I remembered a posting on the LCML from a long while back for Waytek Wire (waytekwire.com). Browsing their site, I found my solution...Waytek distributes the Contura switches from Carling Tech (supplier to ARB as their switches clearly have Carling Switch printed on the sides). While I was dreading fabbing up a panel and cutting lots of rectangular holes for the switches, I noticed the nifty, modular mounting panels that are designed to hold the switches. Some quick measuring and it turns out that a panel can be made to fit the radio hole using six of the panels (two ends and four middles). I already had three switches in use for the ARB setup, now I decided I could relocate the somewhat cheesy switch I was using for my Hella 500 fog lights PLUS I had two spots left to try the in-cab winch controls as outlined by Brian on IH8Mud. I needed the six panels plus two illuminated SPST on-off switches and one unlighted DPDT momentary switch and the associated actuators ( I chose an illuminated black actuator with green lens for the fog lights, a red actuator with red lens for the winch power, and a red actuator with no lens for the cable in/out switch). The panels slide together easily to form a nice unit and the switches snap right into place. I recommend the Actuator removal tool when ordering, as this aids in removing the switches from the panel should the need arise, as well as removing the switch actuators. Once put together, the fun really starts...running the wires. I wont go into great detail here...but I can answer any specifics if you email me at cruisr76@sbcglobal.net. I followed ARBs advice and wired the lockers so that the compressor had to be on for the rear locker to activate and the front locker could only activate if the rear locker was on. The shop that did my compressor install made it a switched negative circuit, so I followed suit with the locker solenoids. As an additional saftey measure ( I was paranoid that since the lockers always had power, if a short occurred in a ground wire, the lockers would activate at a bad time...like 60 mph around a turn in the highway...), I placed a covered switch on the dash for the positive wire to the solenoids. To run with lockers, I have to flip the safety cover up, hit the switch, turn on the compressor, and lastly the rear and front solenoid switches. Quicker done than written...(and I do wish they had wired it according to the ARB instructions...). One last tip. On my 76 FJ40, the top edge of the sheet metal of the radio opening is rounded more than the bottom edge and the switch panel wouldnt snap into the opening very securely. A quick fix is to run a zip tie under the lock tabs on the top of the panel to hold them up higher and the unit will snap firmly into the radio opening. I snipped off the ends of the zip tie flush with the ends of the panel before I clicked it into place. Im hoping that if I need to pull the panel in the future, I can reach the zip tie and pull it clear and then the panel should pull free easily enough. Notice the safety switch in the top right corner of the photo. I used an existing hole (I hate cutting holes!) and the switch wouldnt mount vertically.  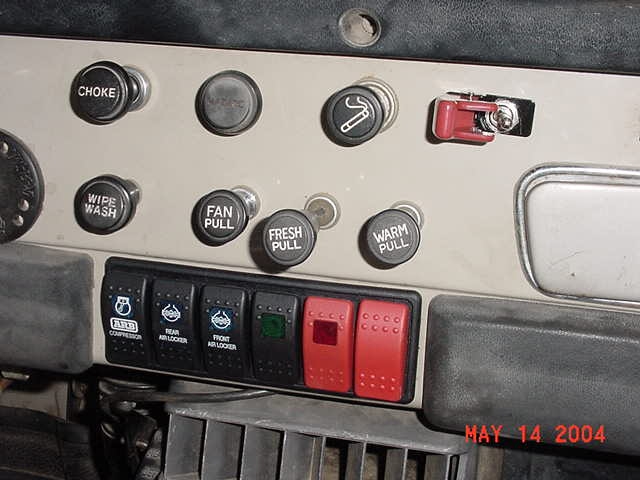 Posted June 29, 2004 |