
Custom rear Receiver Bumper.....
Project completed May 1997
Final info pending.....need time for measurements!
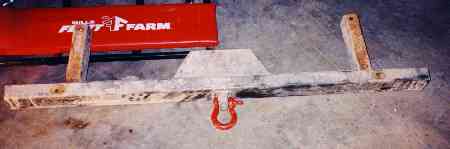 I designed my rear bumper as a custom unit to maximize strength and departure angle. The receiver tube is centered in the bumper rather than hanging below...the receiver pin actually goes in behind the bumper, allowing the outside portion of the receiver to only stick out about 1/2 inch. Thus far I've been very happy with it's design....it had never twisted or caused me any greif....about the only problem is its weight. Installation can be a bear!
Parts Required:
1 ea 4" ID x 2" wide (ID) x 52" long 3/16" wall steel channel
1 ea 4" OD x 2" wide (OD) x 40" long 3/16" wall steel channel
2 ea 2" ID x 3" ID x 12" long 3/16" wall steel tube
8 ea 1/2" x 1" long frame grade bolts (grade 5)
1 ea 2" ID steel square tube, 3/16" wall
1 ea 1/4" thick plate, approx 12" long and 4" wide
Procedure:
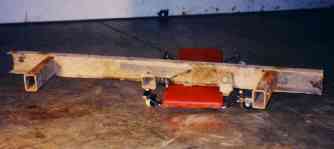
First, remove the existing bumper and inside supports...odds are they are rusted beyond belief anyways. (Also, disconnect your battery so you can weld on the vehicle.) Then clamp both 2" x 3" tubes into the frame and drill holes for the mounting bolts. The tube should stick out abot 1/2" from the end of the frame to allow for trimming. Since I did my bumper without the body tub installed, I drilled two holes in the top and two on the side. CAUTION: You will want to weld the nuts to the inside of this tube, so plan these holes towards the ends....one top and one side at each end. Remove the channel, reinstall the bolts and nuts and tighten well. Weld the nuts to the inside of the channel...you won't be able to get a wrench in there once they are installed.
Reinstall the tubes onto the frame and tighten. Note that your frame flares and that you must now grind/cut off the ends of the tubes to angle them to match. You can either do this while installed or remove to cut. After cutting, align the new outer bumper over the tubes and check for clearances. Once satisfied, tack weld the 2/3 tube onto the outer channel. Remove from the truck and finishe welding the inside and outside securely to the tube...remember that the existing frame may need to overlap so plan your welds accordingly.
Finally, take the inner channel and trim as necessary to fit. Fully weld in place, in 2" increments, at various places around the bumper to distrubute the heat. Once done, take the receiver tube and align it on the bumper and torch out the necessary holes. Slip into position and mark where the pin holes need to be. Drill these, reinstall in the torched holes, and weld in completely. Then weld the reinforcement plate on top of the bumper. Allow to cool completely and paint.
FOLLOWUP: (8/99)
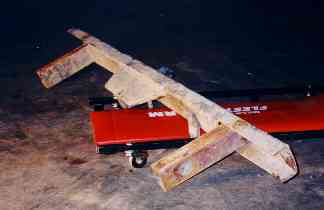
After some serious trail rides, I discovered that the outer ends of the bumper would catch on rocks as I slid down....I cut a triangular piece out of the bumper ends, bent the lower portion up, and rewelded...this gave me a better slide surface for getting off those particularly large rocks.