
Custom front FJ40 Land Cruiser shock towers....
Project completed Spring 1998
The first question I get from everyone is "Why do you need longer shocks? I achieve plenty of travel with the ones recommended for my suspension." Honestly, I achieved quite a bit of travel as well, but I discovered that removing the shocks allowed for an additional 2" of droop and another 3/4" of upward travel. (I was running 2" Softrides in front with the Suspension Correction kit and 1" longer shackles.....as of January 2000, I've got a Spring-Over-Axle setup.) I wanted to do everything possible to maximize my travel and the shock length seemed to be my primary limitation.
The shock length for the Softride suspension ranges from 14" to 24" eye to eye, allowing for 10" of available shock travel. I currently run some hand-me-down Rancho 5000's with a 11.5" travel range. On both compression and extention, the shock is at its extremes. (Remember that your tires will travel further since it is further outboard than the shock.) I could probably use even longer shocks, but haven't taken the time to determine a remount design for the axle tube.
What follows is the list of parts, safety equipment, and procedures to install your new towers. As always, use these directions at your own risk.
TOOLS AND PARTS REQUIRED:
SAFETY:
PROCEDURE:
- Open hood and remove both front fenders. You want a clear work space around the existing towers since you will need to torch/grind/weld in that area.
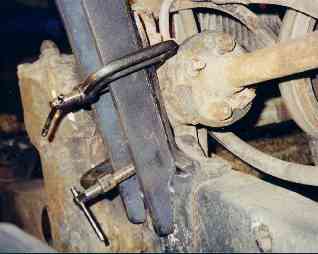
- Remove shocks and existing upper shock pins
- Torch off the majority of the shock tower facing the wheel. You want to remove the mounting eye and the outer rib ONLY. Grind flat to provide a good surface for the tower to set against.
- Cut (torch or cut-off tool) the back side of the new channel to match the angle of the bottom portion of the shock tower where it mounts to the frame. NOTE that the open part of the channel faces outwards towards the wheel. The flat back side of the new tower will lay flush against the existing tower where you just cut/ground it flat.
- Loose mount new tower in place with clamps. Check upper clearance and modify length equally as required. You may need to mount fenders to check for upper obstructions.
- Drill single hole in each tower for the shock studs. MAKE SURE you double check where the towers mount and which direction these holes need to face.
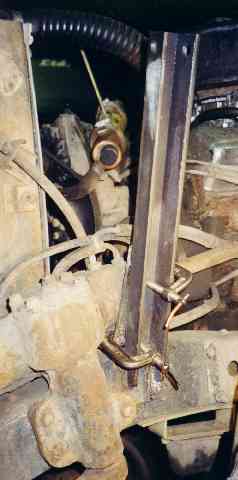
ED NOTE: I strongly suggest having both towers clamped in prior to continuing...much easier to even out their position. - Measure, remeasure and measure again to ensure the new towers are positioned evenly and properly angled front to back. If the angle is incorrect, you may find that your shocks rub against the new tower. (This can be corrected slightly by using the lock washer and a flat washer or two to space out the stud.)
- Tack weld both towers into place and recheck your measurements....easier to remove 4-5 spots than entire completed welds.
- Weld into place and install the shock stud. Prime and paint normally.
- Reinstall fenders and modify sheet metal openings as required for shocks to fit.
Measuring for shocks "usually" means taking your resting ride height and finding a shock that has that number in the center of it's travel range. To be more accurate, you will need to fully cross your suspension (without shocks) and take measurements. Note that a RTI will not fully test your suspension. Find a 2-3' berm where you can park opposite corner tires on the top and allow the other two to droop. This places the greatest amount of stress on your suspension and will better reflect your maximum travel. Monitor how the maximums and minimums compare with resting height to see you much extention/compression you can achieve.