
E-Brake Install
|
Tech information furnished by Brian Swearingen TLCA requires that participants in their sanctioned trail rides have an operational emergency brake. Well, I haven't had the guts of mine installed for quite some time, mostly since I had planned on the Eldorado caliper swap. Since the 2003 BHCC event was coming quicker than my garage time, I opted to reinstall the stock e-brake parts. Accessing the transfer-case mounted factory emergency brake on the FJ40-45-55 series Cruisers first requires you drain the transfer case of fluid and remove the rear driveshaft. Once removed, you can then pull the large nut that retains the e-brake drum (the correct metric size is 27mm, but I used a 1-1/8" SAE which fits close). Yes, this is on there tight, so make sure the vehicle is in gear. With the nut removed, pull the drum free. With the drum clear, you can now see the guts of the process. To pull everything free, you need a needle-nose pliers and a small flat-blade screwdriver. First pull the 3 springs, noting their orientation and location. Then pull the two clips and pins that keep the shoes snug to the backing plate. With those clear, remove the bottom cam/adjuster - this takes a bit of wrestling, and make sure it's completely "loose" before attempting (10mm combo wrench). With all the other hardware clear, work the shoes free of the upper pivot and then wrestle some more with the spring/cable connection. (this is the part that always seems toughest...removing AND installing!) Take the time now to clean all the parts and make a determination as to whether you need to replace the existing shoes. The shoes on mine were satisfactory, so I just cleaned everything with parts cleaner and then some brake clean...springs, cam, shoes, drum, etc should all be cleaned up. Also, if you've had any oil seepage from the e-brake drum, now is the time to replace the rear t-case seal (need to remove the 4 12mm bolts and backing plate for this process.) Also inspect the seal-surface on the e-brake drum...if it's grooved at all, it's not a bad idea to install a speedie sleeve to prevent leaks. These first two photos show the parts that came out. 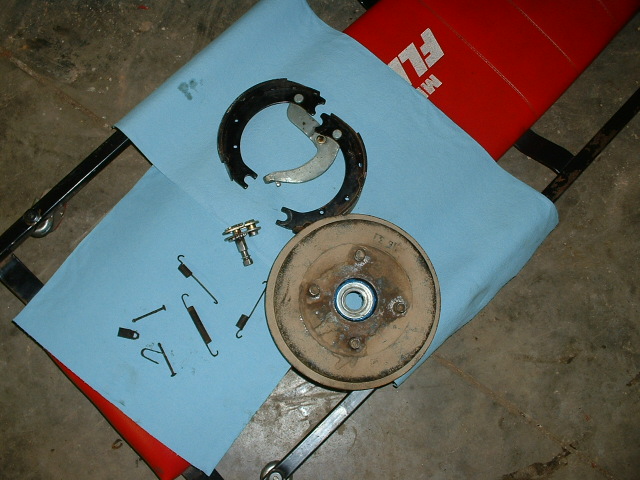
 This photo shows the empty backing plate...you can see the pivot on the upper side, the output shaft, and the the e-brake cable. If you are replacing the cable assembly, there is a tiny clip that retains it in the backing plate...remove this with a small screwdriver. It's a bear to get free, but it's pretty soft and will bend back with a needlenose easily. You can also see the 4 12mm bolts that would be pulled to access the seal...you do NOT need to remove the cable for this tho. 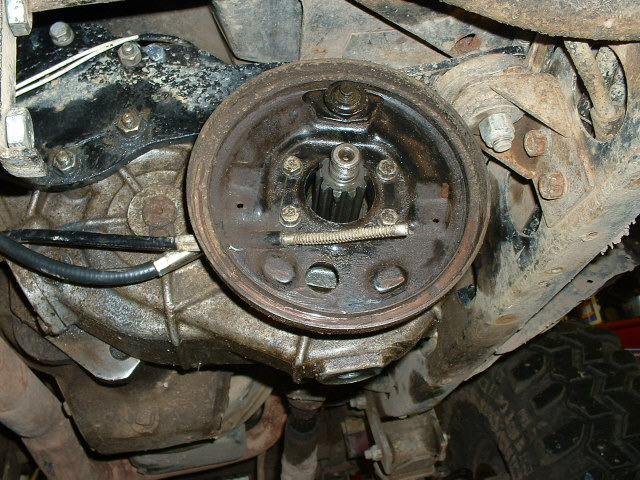 Here you see the shoes installed with their retaining pins/clips, and the cam adjuster. When I install the shoes, I first wrestle the cable onto it's attachment point, then work the shoes onto the upper pivot. Installing the spring with the shoes already on is near impossible. With the shoes on the pivot, then install the pins/springs and the cam adjuster. 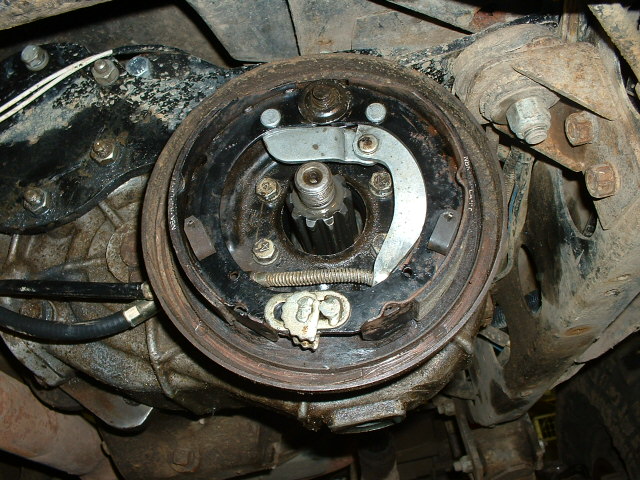 Finally, install the 3 tensioning springs. Make sure the cam is backed loose as well, so the drum can slip on easily. When putting the drum on, there is a washer between the big retaining nut and the drum splines that covers the splines...I use some RTV behind the washer to help control gear oil seepage thru the output splines. With the washer on, slip the drum into place and torque down the retaining bolt to 130 ftlbs.  Finally, adjust the drum tension. I used my 10mm combo wrench and with the t-case in neutral, clicked it one step, checking to be sure it still allowed the t-case to spin freely. As soon as I felt resistance, I backed it off one notch. Then, pull the e-brake cable and make sure it does indeed lock it tight. Last steps are to reinstall the rear driveshaft, reinstall the t-case drain plug and fill with oil, and reinstall your skid plate. Happy Braking!! ;-) Posted July 17, 2003 |