PARTS/COSTS REQUIRED: (Yes, I got a few deals!)
SM465 granny trans w/ 10-spline output shaft (P/N GM6273212, $40)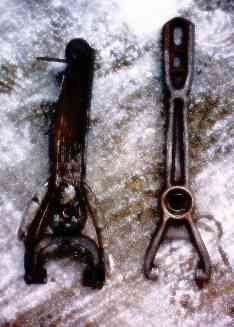 Bellhousing (aluminum, P/N GM6263756, included w/ transmission)
Release fork (cast iron, from the early cast-iron bellhousing trucks, $5)
Pressure plate, disc, throwout, alignment tool - 12" (Luk P/N 04-064, $230)
Slave cylinder adapter bracket (Classic Cruisers [Advance Adapters], $31)
Custom adapter plate (Classic Cruisers, $375)
Transfer bolts (three 12 x 120 - 1.25 and two 12 x 40 - 1.25, $15 total)
Machine shop charge to drill/tap transmission output shaft (3 dozen donuts, 1 case beer)
Machine shop charge to resurface flywheel ($25)
Bellhousing (aluminum, P/N GM6263756, included w/ transmission)
Release fork (cast iron, from the early cast-iron bellhousing trucks, $5)
Pressure plate, disc, throwout, alignment tool - 12" (Luk P/N 04-064, $230)
Slave cylinder adapter bracket (Classic Cruisers [Advance Adapters], $31)
Custom adapter plate (Classic Cruisers, $375)
Transfer bolts (three 12 x 120 - 1.25 and two 12 x 40 - 1.25, $15 total)
Machine shop charge to drill/tap transmission output shaft (3 dozen donuts, 1 case beer)
Machine shop charge to resurface flywheel ($25)
NOTE: It is assumed that you aready have a small-block Chevy engine installed using available motor mounts and the rear transfer case cross member. Should you need the motor mounts and cross member, expect around another $200 in parts. Also, this conversion is available for the later 1.99:1 transfer case, however you need to purchase a custom TC input gear as well....I believe this is about $100.
PREPARATION:
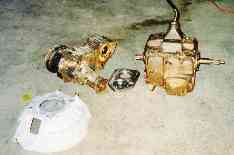
Clean Clean Clean!! You will have a much easier time working with everything if you take a day to thoroughly clean all the parts.
Bellhousing: Mine originally used mechanical linkage, so I removed the stud and installed the Slave adapter bracket. In order for the bracket to fit, I had to file a small portion of the aluminum housing. My aluminum bellhousing had a minor crack around the starter area, so I had an additional charge to get that welded. (cost: one 12-pack beer)
Transmission: Other than cleaning, draining, and tapping the output shaft, there isn't much required.
Transfer: Much more to do here. Early transfer cases use smaller driveshaft flange patterns and smaller bolt sizes. If you are installing into a '73 (?) and older Cruiser you will be able to bolt everything up. '74 and later Cruiser conversions will require some "shuffling" of parts to allow use of existing driveshafts and bolt patterns. Fortunately, Toyota was smart about their transfer cases. The front output flange and the rear drum flange are both completely interchangeable between transfer cases. Unfortunately, this means scavenging from your later model case, but such is life! I am "assuming" this hold true for all early and late cases, but for reference, I used the flanges from my '74 transfer case on the '69 without problem. (Unfortunately, I had shattered my '74 case a couple years back...may never forgive myself!)
 Linkage: The vacuum system will need to be replaced, either with one of the aftermarket kits (@ $200) or by adapting the later linkage. Again, removing the vacuum setup from the side of the front output and installing the later mechanical setup is simple since everything bolts right in. I used a 4" x 5" x 3/16" plate on the side of the transmission, drilled to fit the two offset existing bosses. I then removed the stock pin from the side of the 4-speed and drilled a hole to bolt it into place (needs a 16 - 1.50 nut, $1.95). Took a bit of tweaking to get everything aligned, but seems to work well. Did not reuse stock guide plate....allows for 2wd low this way. Linkage: The vacuum system will need to be replaced, either with one of the aftermarket kits (@ $200) or by adapting the later linkage. Again, removing the vacuum setup from the side of the front output and installing the later mechanical setup is simple since everything bolts right in. I used a 4" x 5" x 3/16" plate on the side of the transmission, drilled to fit the two offset existing bosses. I then removed the stock pin from the side of the 4-speed and drilled a hole to bolt it into place (needs a 16 - 1.50 nut, $1.95). Took a bit of tweaking to get everything aligned, but seems to work well. Did not reuse stock guide plate....allows for 2wd low this way.
ASSEMBLY:
- Thoroughly clean the mating surfaces where the transmission and transfer case match up with the adapter plate.
- Install the adapter on the rear of the transmission. I used gasket sealant on both sides since this gasket must retain the transmission oil. Use locktite red on the 8 allen bolts and install tightly. You don't want these coming loose!
- Glue the transfer gasket into place and align the transfer case with the transmission. This takes a bit of juggling to get positioned properly - I could've used 4 hands. Also, I had to keep the bolts quite loose initially to get them all started. Again, use gasket sealant, locktite red on the bolts, and tighten well. NOTE: assemble the transfer to the plate prior to full assembly. Ensure that NONE of the 5 bolts extend thru the plate so far as to interfere with the bearings or transmission.
- Slip the transfer gear into place via the side access and install the retaining bolt. I used locktite red again and torqued to 80 ft lbs. NOTE: Placing the tranny in granny gear and holding the input shaft with a rag will give you enough resistance for torqueing. I re-torqued to 120 ft-lbs.
- Install the transfer linkage plate and "tweak" to align. I had to bend the lower portion of the plate and keep the lock washer on the outside for everything to line up.
- Total assembly time: about 1 hour. Piece of cake.
|
TIP #1: The crossmember you use on the back of the transfer case has one large center hole for your output shaft to extend thru and 6 holes to attach to the back of the transfer case. If you check your new gasket, there is also an additional small hole towards the bottom. This hole is to return oil from the cover area back to the transfercase. Align your gasket and drill this small hole in the crossmember, otherwise the pooling oil in the cover will tend to seep and leak.
TIP #2: When installing gaskets, I use Permatex Super High Tack Gasket Sealant on one side and #2 Form-A-Gasket Sealant on the other. The Form-A-Gasket is used on the side of the part you keep forever, like an engine block, since it removes easily. The Super High Tack is on the disposable part, like a water pump, so the gasket stays there and doesn't stick to the block. Makes replacing parts easier when you don't have as much gasket cleanup to do.
|
INSTALLATION:
- Obviously, remove your existing transmission, transfer case, bellhousing, and clutch. I usually remove both seats, the fuel tank, tunnel cover, and anything else that's in the way. (I don't have a heater, but I suspect that'll go as well.) Take your flywheel in for a resurfacing...may as well only do this once!
- Install the input bushing and the clutch disc/plate, using your alignment tool. Torque to manufacturer specs.
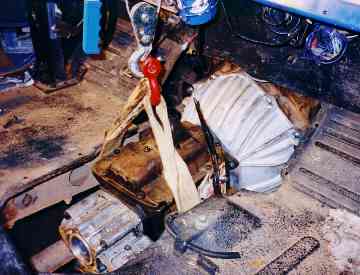 - Install the assembled bellhousing/tranny/transfer (including clutch fork and throwout). [NOTE: The steel clutch fork used with the Aluminum bellhousings does not work...tried it. Picked up the cast from from an older SM465 and it works perfectly...see pics above.] I used a come-a-long attached to the center bar of my roll cage for lifting and a floor jack for aligning. An engine hoist can work for the above lifting or you may have an actual tranny jack. (DO NOT bench press into place....I can handle a Toyota tranny/transfer without much trouble, but the SM465 is a bunch heavier.) Once aligned and into place, install/torque the bolts. Also, when I first tried to align everything, I had the bellhousing installed and just the tranny/transfer left to go......however I was uncomfortable using the aluminum threads in the bell housing to draw in the transmission. Decided the cast threads in the engine block would serve better,....also helped to have the bit of extra leverage that the bellhousing offers.
- Leaving the floor jack in place, align the rear for installation of the new crossmember. Again, use new gaskets and gasket sealant. The length of the original Advance bellhousing, 4-speed transmission, and the transfer case is within 3/8" of the length of the new GM bellhousing, SM465, adapter, and transfer case. I was able, by slightly shifting my mounting bolts, to use the original holes in the frame to install. Also means my drive shafts will require no modification.
- Don't forget the slave cylinder adapter bracket...install the slave cylinder while your there...it is now positioned upside down and used standard bolts, not the original metric. Run a new line and bleed per manufacturer specs. Also install a clutch arm return spring.
- Reinstall the tunnel, fuel tank, seats, driveshafts, etc.
Why did I chose the Classic Cruisers adapter? The biggest reason was cost. I already had a cheap tranny, an extra early transfer case, and the V8 conversion installed. This save nearly $500 in possible charges. The Advance Adapters kit is 5" long...meaning new driveshafts. Also, the rear drive shaft would end up extremely short. Based on the parts I already had in the garage and the deals I got, this conversion made the most sense.
As always, you're responsible for the success of your own conversion. All I can do is tell about what worked (and didn't) for me!
|

 to have an early transfer case in the garage to use for the conversion AND a broken later case to scavenge parts from. This gave me the chance to not only have the transmission and bellhousing all cleaned, but to have the transfer cleaned as well. This also allowed the opportunity to nearly fully assemble the project prior to removing the existing transmission, keeping down time to a minimum.