|
 There are lots of FJ40s with 350 conversions out there. I did mine after seeing
just how many people had already done it and how much they were willing to
share their experience.
There are lots of FJ40s with 350 conversions out there. I did mine after seeing
just how many people had already done it and how much they were willing to
share their experience.
But I had no idea I was going to have so much "fun" mounting the pulley-driven
parts and getting the pulleys to line up! So, after going through a lot of
gymnastics, here's the hell I went through. I'm pretty sure I'm not the only
one to have a few issues, but damn, I hit a snag around every corner.
Of course, I covered it up by making out like it was no big deal. "Hey,
put a shivvy in her. You won't regret it." But the sad truth is that I had to
customize the whole shebang just to get the pump to pump and the alternator to
alternate. I don't regret putting a small block in; there's nothing liike a V8
with dual exhaust. But you'll be ahead if you read about my mistakes and
misteps and think of better ways.
They say the first thing to do when you're in a hole is stop digging. The
following is a testament to what can happen if you just can't put the shovel
down!
|
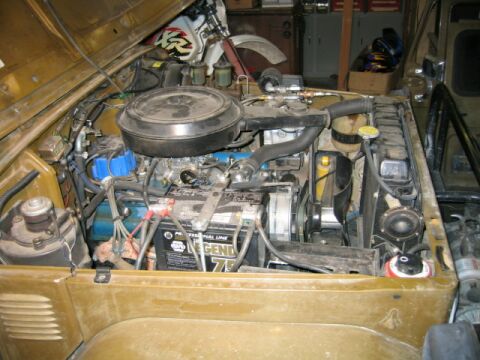
 I bought the 350 from a friend who upgraded to the new 502. It was a strong
runner and completely stock out of a '69 C30 flatbed. It came with headers, no
power steering, no crankshaft pulley, and the alternator was mounted high on
the driver's side.
I bought the 350 from a friend who upgraded to the new 502. It was a strong
runner and completely stock out of a '69 C30 flatbed. It came with headers, no
power steering, no crankshaft pulley, and the alternator was mounted high on
the driver's side.
I had already decided I wanted Saginaw power steering, ram's
horn exhuast, and a York compressor. I found ram's horns and a Saginaw gear box
and steering pump in the bone yard. I rebuilt the pump, rebuilt the alternator
that came with the engine, and figured I was off and running. Yeah, right.
|
 I scrounged alternator brackets from a mid '70s GM car in the wrecking yard.
I brought these home and realized my '69 water pump wasn't cast to accept them.
So I bought a later model water pump. Then I had to go "shopping" for a water
pump pulley since the old one wasn't deep enough to align with the new
alternator pulley position.
I scrounged alternator brackets from a mid '70s GM car in the wrecking yard.
I brought these home and realized my '69 water pump wasn't cast to accept them.
So I bought a later model water pump. Then I had to go "shopping" for a water
pump pulley since the old one wasn't deep enough to align with the new
alternator pulley position.
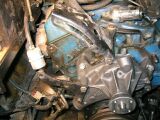
The two main brackets are stock, but the crosspiece that supports the rear
side of the upper bracket is custom. This was about the easiest piece I made
throughout the project and it still took an evening.
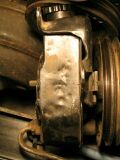
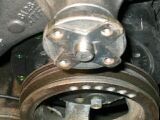
|
 This photo shows the custom bracket I made to hold the outboard end of the
power steering pump as well as serve as a platform to hold the York compressor.
(The water pump is not installed in this picture.) There are 3 anchor points
for the steering pump: one is the slotted lower part of the bracket in the
photo. I cut up part of a stock pump bracket to get just the slotted
part, then welded it on. Another anchor point is the threaded
cylinder in the head, which I made from mild steel round stock. The third
anchor is on the water pump (not shown). The bracket itself is bolted to
existing holes in the head and in the exhaust manifold.
This photo shows the custom bracket I made to hold the outboard end of the
power steering pump as well as serve as a platform to hold the York compressor.
(The water pump is not installed in this picture.) There are 3 anchor points
for the steering pump: one is the slotted lower part of the bracket in the
photo. I cut up part of a stock pump bracket to get just the slotted
part, then welded it on. Another anchor point is the threaded
cylinder in the head, which I made from mild steel round stock. The third
anchor is on the water pump (not shown). The bracket itself is bolted to
existing holes in the head and in the exhaust manifold.
|
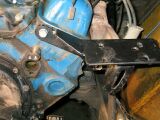
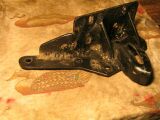 Here's another look at my abomination of a bracket. It's part GM, part Volvo
(brought it home from the bone yard with the York), and part Theo.
Here's another look at my abomination of a bracket. It's part GM, part Volvo
(brought it home from the bone yard with the York), and part Theo.
|
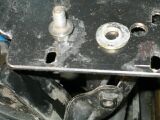
 Here's a bird's eye view of the back side of my steering pump after about a
year. It came off a '70s GM car, bracket included, dent-free! Seems my custom
setup is resistant to belt adjustment and I have to pry pretty hard to get
enough tension. That's a direct result of just fabbing the stuff because I
don't have time to design it correctly. (I always have time to do it again,
though.)
Here's a bird's eye view of the back side of my steering pump after about a
year. It came off a '70s GM car, bracket included, dent-free! Seems my custom
setup is resistant to belt adjustment and I have to pry pretty hard to get
enough tension. That's a direct result of just fabbing the stuff because I
don't have time to design it correctly. (I always have time to do it again,
though.)
Anyway, after realizing I was going to skewer the fluid reservoir I've been
using "alternate methods" to get the steering belt tight. (I realize I should
have welded in a "pry plate" the last time I had it off. 20/20 hindsight's my
middle name.)
|
 And wouldn't you know it, after hours of booty fab I had to use a spacer
between the stationary slotted bracket and the sliding pump bracket? The spacer
is lying on top of the bracket. Probably could have said to heck with it and
just let the brackets be pinched together but I was in deep already, so what's
another hour to turn out a custom washer?
And wouldn't you know it, after hours of booty fab I had to use a spacer
between the stationary slotted bracket and the sliding pump bracket? The spacer
is lying on top of the bracket. Probably could have said to heck with it and
just let the brackets be pinched together but I was in deep already, so what's
another hour to turn out a custom washer?
|
|
Crankshaft Pulley
(
top
)
|
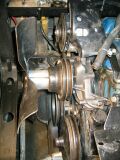
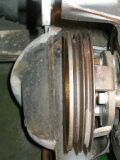 I looked at quite a few pulleys in the wrecking yard before I found one that
was about the right diameter. Of course, when I bolted it on it didn't line up
with the alternator and water pump pulleys. So I turned some custom spacers on
the lathe.
I looked at quite a few pulleys in the wrecking yard before I found one that
was about the right diameter. Of course, when I bolted it on it didn't line up
with the alternator and water pump pulleys. So I turned some custom spacers on
the lathe.
The spacers are just visible on the far right in the photo. (The front diff
blends in with the front of the pulley; kind of hard to distinguish). The
spacers are 1" diameter discs with threaded extensions off the back to thread
into the harmonic balancer. They have threaded extensions sticking forward to
hold the pulley. The first 1/4" or so is a snug fit with the mounting holes in
the pulley. I did that to index the center of the pulley with the center of the
crankshaft. It worked but not very well; I have a slight amount of wobble in
this pulley.
|
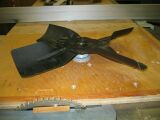 I found an 18" 4 blade rigid steel fan in near perject shape just lying there
all shiny and clean saying "Theo, take me home." So I did. But since I thought
low center of gravity was important, I mounted the 350 kind of low in the well.
That meant my nice fan was going to sever the lower radiator hose unless I cut
it down. So I did.
I found an 18" 4 blade rigid steel fan in near perject shape just lying there
all shiny and clean saying "Theo, take me home." So I did. But since I thought
low center of gravity was important, I mounted the 350 kind of low in the well.
That meant my nice fan was going to sever the lower radiator hose unless I cut
it down. So I did.
I don't recommend this; it takes care to get the balance back. In fact the
first chance
I get I'll find a fan that fits. But this one has worked for a year and a half
(but with not much run time). I didn't get a photo of my "jig" for cutting it
down. Basically I fastened the fan by the center hole to a steel bar, clamped
the bar to the saw table, and rotated the fan blades into a metal cutting
wheel. This put me pretty close. I finished up with this lawn mower blade
balancing trick, grinding a little here, a little there until it sat level.
|
 Of course, I haven't had a straightforward solution yet, so why should the
fan pulley be any different? Turns out I had to shim it using this little
marvel. It's what's left of a real fan pulley spacer I found in my wanderings.
I removed as much metal as possible to reduce balance problems.
Of course, I haven't had a straightforward solution yet, so why should the
fan pulley be any different? Turns out I had to shim it using this little
marvel. It's what's left of a real fan pulley spacer I found in my wanderings.
I removed as much metal as possible to reduce balance problems.
|
 So, after quite a few evenings and a whole heap of head scratching, I have a
basic setup. The alignment is good all round. I say that because one of the
symptoms of poor alignment is rounded edges on your belts after a few months. I
had it so bad on my compressor belt that it would flip over and run inverted,
but the main belts haven't shown excessive wear yet. (See below for more on the
York alignment.) The whole process reminds me of Johnny Cash singing "I built
it one piece at a time, and it didn't cost me a dime . . ."
So, after quite a few evenings and a whole heap of head scratching, I have a
basic setup. The alignment is good all round. I say that because one of the
symptoms of poor alignment is rounded edges on your belts after a few months. I
had it so bad on my compressor belt that it would flip over and run inverted,
but the main belts haven't shown excessive wear yet. (See below for more on the
York alignment.) The whole process reminds me of Johnny Cash singing "I built
it one piece at a time, and it didn't cost me a dime . . ."
|
 The bracket that holds the compressor is from a stock Volvo (came with the
compressor). It is U-shaped
and is bolted down to the "base" bracket I had already made to anchor the
steering pump. (see
Steering pump section
above). I filed the mounting holes into vertical slots so the compressor could
slide up and down. That gave me a way to install and adjust the belt. At first
I used a flat plate between the u-bracket and the base bracket in an
attempt to make it easier to tension the belt. The base bracket had a bolt
threaded down into its center and the flat plate sat on top of that. All I had
to do was "unscrew" the bolt to raise the plate and the compressor and put
tension on the belt. But I used a large bolt with a big head and the clearance
I needed to fit the right wrench between the plate and base consumed half my
travel. So I eliminated the adjusting bolt and plate and now use a screwdriver
to pry the compressor upward and hold tension while I tighten one or two of the
6 bolts that hold the compressor in. Works a charm and is simple. I just hope I
don't have to come back next month and show pictures of a York with a hole in
the crankcase from my prying and a hole in the top where the piston left town.
The bracket that holds the compressor is from a stock Volvo (came with the
compressor). It is U-shaped
and is bolted down to the "base" bracket I had already made to anchor the
steering pump. (see
Steering pump section
above). I filed the mounting holes into vertical slots so the compressor could
slide up and down. That gave me a way to install and adjust the belt. At first
I used a flat plate between the u-bracket and the base bracket in an
attempt to make it easier to tension the belt. The base bracket had a bolt
threaded down into its center and the flat plate sat on top of that. All I had
to do was "unscrew" the bolt to raise the plate and the compressor and put
tension on the belt. But I used a large bolt with a big head and the clearance
I needed to fit the right wrench between the plate and base consumed half my
travel. So I eliminated the adjusting bolt and plate and now use a screwdriver
to pry the compressor upward and hold tension while I tighten one or two of the
6 bolts that hold the compressor in. Works a charm and is simple. I just hope I
don't have to come back next month and show pictures of a York with a hole in
the crankcase from my prying and a hole in the top where the piston left town.
I thought I had the pulley alignment pretty well sussed, but after awhile the
belt developed rounded edges and eventually started flipping inside out every
time I started the engine. So I went back and elongated some bolt holes so I
could move the compressor fore and aft. So far so good.
|
|
I wrote these pages because I wanted to admit in public what a pain in the rear
it was for me to get my accesories mounted on the front of my engine. When I
was thinking about doing the small block conversion, I wasn't hearing about
these pulley issues from anybody. Nobody was talking about how much trouble it
was to add a York, for example, or a power steering pump. I keep telling myself
it's because most people just don't like to admit they had a hard time of it
when nobody else did.
That's what I tell myself. That's what I'll keep telling myself, even though
I'm pretty sure I'm just not that good at thinking things through. And maybe
nobody was making a big deal of it because it isn't a big deal! Well, I have a
way of making things more complicated than they need to be.
Still, maybe you can get some insight from what I've written. Good luck to you!
Cheers,
theo
|
|
Acknowledgements
|
 I hesitate to advertise the existence of this web site purely out of
selfishness. If you go there you may be stealing bandwidth from me, because I
spend WAY too much time there. I developed my current fixation with Land
Cruisers based on what I found at ih8mud.
I hesitate to advertise the existence of this web site purely out of
selfishness. If you go there you may be stealing bandwidth from me, because I
spend WAY too much time there. I developed my current fixation with Land
Cruisers based on what I found at ih8mud.
|
 If you want to see how conversions like this can look when they're done with
real skill, take a look at these pages. Awesome custom work on all
cruisers. (Jack's son made the cool background that I stole to use on my photo
pages.)
If you want to see how conversions like this can look when they're done with
real skill, take a look at these pages. Awesome custom work on all
cruisers. (Jack's son made the cool background that I stole to use on my photo
pages.)
|
|